Final Product What You'll Be Creating
In this 3 part Maya workflow tutorial you will learn how to model, texture, and render a Katana, the legendary Samurai sword. For the modeling portion, we will use Maya’s basic polygon editing tools, while UVlayout will be used to create the UVs, and of course Photoshop to create the textures. We will also briefly cover Mental Ray for rendering the final image.
Step 1
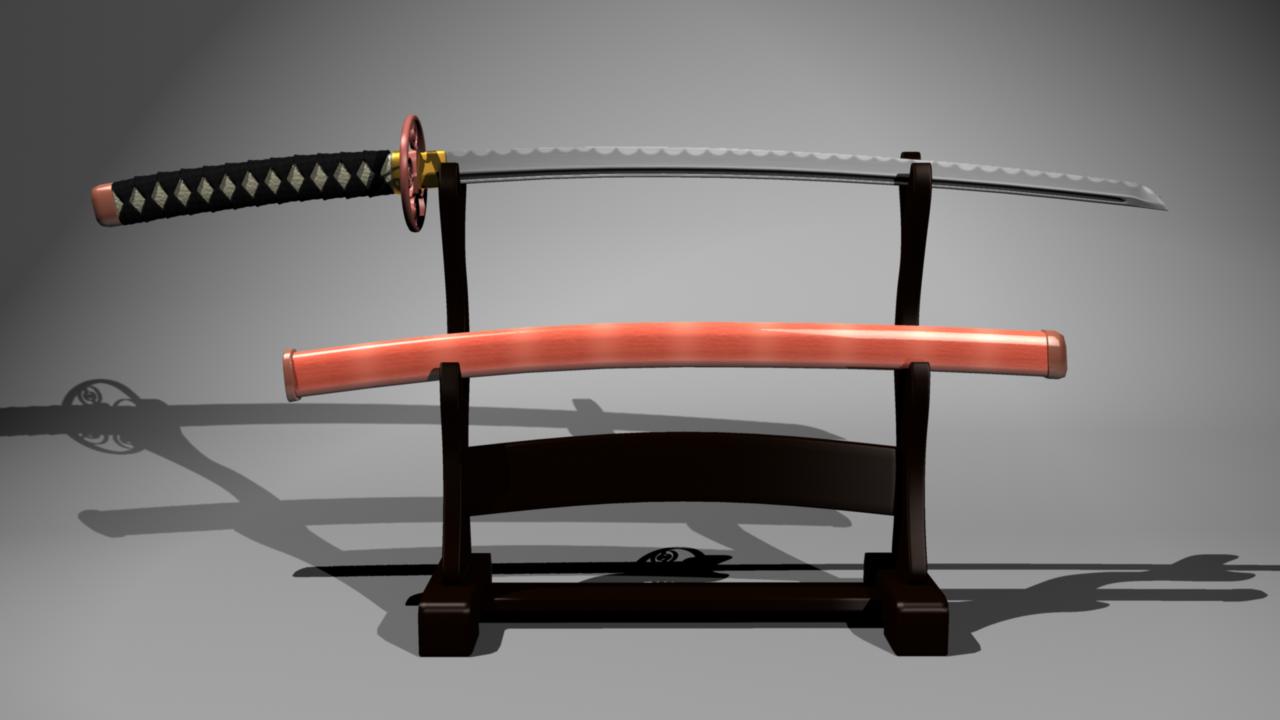
Every project should begin with research and reference. In the picture (provide at the top of the post) you can see all the parts of a Katana and their names. We are not going to go into such detail, and mainly just focus on the tsuka(handle), the tsuba(handle guard), blade, saya(scabbard), and a few other little pieces. You are, however, always welcome to go in as much detail as you want.

Step 2
Open the Four-View layout, and in the Side view go to “View>Image Plane>Import Image”, and import the ‘katana_blade_outline.jpg’ image.

Step 3
Create a polygon cube (Create>Polygon Primitives>Cube).

Step 4
In the Channel Box, under the Inputs for the cube, enter about 0.5 for the Thickness of the blade, 6 subdivisions for the height, and 2 for the width.

Step 5
Scale the height of the cube, so that it is about the same height as the blade.

Step 6
Go in to edit vertices mode by right clicking on the cube and choosing Vertex. Now align the vertices with the outline of the blade.


Step 7
With the Merge To Center tool, create the edge of the blade. In edit vertices mode, select the two vertices that are going to be the edge, then under “Polygons” go to “Edit Mesh>Merge To Center”. Repeat this operation for all the vertices that are going to be the edge.


Step 8
Under edit faces mode, select the top two faces and delete them.


Step 9
Under edit edges mode, select the top edge loop by double clicking on one of the edges.

Step 10
Extrude them to the tip of the blade (Edit Mesh>Extrude). Note: You can use the world space coordinates mode by clicking on the small circle when using the extrude tool.

Step 11
Now add another edge loop right at the tip of the small triangle using the Insert Edge Loop Tool (Edit Mesh>Insert Edge Loop Tool).


Step 12
Position the vertices so they follow the lines of the blade.

Step 13
Use Merge to Center on the vertices of the extruded part of the blade.

Step 14
Looking from the back, the tip comes to an abrupt end. We are going to fix that by bringing together the vertices on the back, so that they flow much better.


Step 15
Do the same with this pair of vertices.

Step 16
At this point duplicate the blade mesh, because you are going to need it later. Select the mesh and go to “Edit>Duplicate”, or use the keyboard shortcut “Ctrl+d”. You can hide the duplicate object for now by selecting the duplicate and pressing “Ctrl+h”.

Step 17
Now you need to add a few more edge loops so that you can create the blood groove.

Step 18
In the Side view, position the vertices from the two horizontal edges you just added, so that they form a triangle. This will be the tip of the blood groove.

Step 19
Select the faces that will form the blood groove. Make sure you selected them on both sides and all the way to the end.

Step 20
Extrude the selected faces inward.

Step 21
Here we will stop working on the blade, and focus on the Tsuba(handle guard). The design of the Tsuba can be anything you like. It doesn’t necessarily have to be circular, and it can be as plain or detailed as you want.

Step 22
For this tutorial we are going to make a simple circular design, with some circular patterns. In the top view import the tsuba_motif.jpg image as an image plane.

Step 23
In the Top view panel go to “View> Image Plane> Image Plane Attributes> the name of the image plane”. This will open the Attribute editor with the attributes for the image plane.

Step 24
In the Attribute editor, enter around 0.3 for the Alpha Gain. This way your image becomes transparent so that you can see what’s going on and it’s easier on the eyes.

Step 25
Scroll down to Placement Extras, and move the image in either x or z, so that the blade is not in the middle of it. If you need to see the grid, move the image plane downward on the y axis (negative number)

Step 26
Create 3 polygon pipes:

Step 27
Make sure that they are all the same height and that they are pretty much aligned properly. You can use the align tool to do this, but it is not necessary, as doing it by eye would be just fine.

Step 28
Select the 3 pipes and combine them in one mesh (Mesh>Combine).

Step 29
Add edge loops so that you can connect the pipes to each other.

Step 30
In the Perspective view, delete the faces where the connecting lines will be.

Step 31
By using the Bridge tool you can connect the two holes. In Edge mode, select the edge loops around both holes, then go to “Edit Mesh>Bridge” and click on the little square.

Step 32
The Bridge should be of linear type and have 0 divisions. Repeat this for all of the connecting lines.


Step 33
Create another pipe, this will be the outer part of the Tsuba.

Step 34
Because of the curvature of the blade, it’s going to be difficult to center it properly, so we are going to create the Habaki (the part that locks the scabbard) first. For this, we will use the duplicate mesh we made earlier. Unhide it by going to “Display>Show>All”, and then create another duplicate, and hide it just in case you need it later.

Step 35
Place it next to the blade for better visualization, and add an edge loop for the height of the Habaki.

Step 36
Select the faces that will be the Habaki, and extract them (Mesh>Extract). Make sure you haven’t selected the bottom faces, if you have, just delete them. With this, we have extracted the selected faces in to a separate mesh. Delete the rest, as you don’t need it anymore.

Step 37
Flatten the lower vertices so that they are horizontal by selecting the vertices and scaling them on the y axis only.

Step 38
Place the extracted piece so that it fits around the blade.

Step 39
With the Extrude tool, add thickness to the piece, by using world mode and scaling outward.

Step 40
Duplicate this piece and scale it a bit.

Step 41
Now that we have our center point we can hide the blade and continue with the Tsuba.

Step 42
Scale down the circular piece you made earlier and place it inside the outer pipe of the Tsuba. The height of the pieces should be a little smaller than the outer pipe. If you used 3 so far, a scale of 0.1 in the y axis should be just right. We will tweak and refine the shape of the Tsuba when we start smoothing things out.

Step 43
Now we are going to work on the Tsuka (handle). Create a polygon cube, with 4 subdivisions along the height, and 3 subdivisions for the width and depth.

Step 44
Scale the cube to the size of the handle. The height should be a little bigger than a third of the blade. The width should be about the same size as the blade, and the depth should be about one and half times that of the blade. This will look a little thicker when we add the cloth pieces later.

Step 45
In the Top view, isolate the cube so that you can only see the scaled cube (Show>Isolate Select>View Selected).

Step 46
Grab the corner vertices and scale them inward so that they form the smooth shape of the handle.

Step 47
In the Side view, move the rows of vertices so they form the curvature of the handle. The curvature should follow the one of the blade. Note: Put the cube next to the back of the blade and copy the curvature from there, from that point you will just need some minor tweaks.

Step 48
Create a cube with 2 subdivisions along all the axis.

Step 49
Delete the top and bottom faces.

Step 50
In the Side view, select the middle column of vertices and scale them inward along the y axis.

Step 51
In the Top view, select the middle column of vertices and scale them outward along the z axis.

Step 52
Now that you have a bow shape, rotate and scale it so that it fits nicely around the handle. This will be the cloth part.

Step 53
Now we are ready to start smoothing out our model, and adding the finishing touches. If you haven’t saved the scene so far, now would be a good time to do so.

Step 54
We are going to use the Smooth mesh preview feature that I believe comes in Maya from version 8.5. For those of you who have an older version of Maya, you can achieve almost the same effect by converting your mesh from polygon to sub-d, and then working in polygon mode. Now select the blade and press 3 on your keyboard. You should get an irregularly smoothed mesh.

Step 55
We are going to fix this by adding edge loops to hold our edges. First add one near the edge of the blade.

Step 56
Add one near the edge of the back part of the blade.

Step 57
Add one horizontally near the tip of the blade.

Step 58
You will notice that we now have a bit of an edge sticking out. Zoom in where the edge is sticking out and go back to standard view by pressing 1 on your keyboard. Select the top and bottom vertices.


Step 59
Merge the two vertices to get rid of the bad looking edge, and still remain with nice quad geometry. Now press 3 again and see the nice clean edge. You may need to move the merged vertex a little to better follow the curve.

Step 60
Add one near the blood groove from the blade edge side to keep that edge sharp.

Step 61
Go to the bottom of the blade and delete all of the faces.


Step 62
If somewhere you find a hard edge that you don’t like or don’t want, like here, all you have to do is space the edges a little and that should do the trick. Edges that are close to each other will create a hard edge. I like the flow of the edge in the picture so I’m going to leave it. With that we are done with the blade.

Step 63
Select the part of the Tsuka that we duplicated from the Habaki, and delete it. We are going to work on the Habaki, and then use that to create this part.

Step 64
By pressing 3, we can see that the top and bottom edges are deformed, so we are going to add some edge loop on the outside and the inside to fix it.


Step 65
Also the corners of the Habaki are smooth, so we are going to add one edge loop on each side of the corner.

Step 66
The corner by the edge of the blade will require a bit more attention. In the top view, add one edge loop on both sides.

Step 67
Select the vertices on the outer wall from the edge loops we just added, and bring them forward a bit, so they form a more uniform thickness, and are closer to the original edge. This should be enough for the Habaki.


Step 68
Duplicate the finished Habaki, and scale it outward a bit. Scale down the height as well, so that it’s about the same height as the outer pipe of the Tsuba.

Step 69
Now we need to refine the shape a bit. The goal is to fit it as snugly around the Habaki as possible, and that the outer wall (when smoothed) is a little wider than the handle beneath it. First, we are going to fit it nicely around the Habaki. In edit vertices mode, select the back vertices, and pull them back a little, so that they don’t intersect with the Habaki.


Step 70
Select the vertices on the back wall, and move them backward to give it some more thickness.

Step 71
Select the top vertices in the middle, and move them backward so that they follow the line of the Habaki.

Step 72
Now we are going to widen the front point so that it covers the handle. Select the outer vertices of the edges we added earlier and scale them outward.

Step 73
Press 3 on your keyboard, and that should be it for this piece.

Step 74
Select one of the ornament pieces that you created from the 3 pipes, and press 3 on your keyboard. As you see almost all of the edge definition is gone.

Step 75
We will fix that by adding edge loops. Start by adding one near the top and bottom for the outside.

Step 76
Add 2 edge loops in every hole of the piece, one near the bottom and one near the top. Delete the ones you duplicated earlier, as we are going to use this piece instead.


Step 77
Before we duplicate and place this piece, we are going to finish the outer pipe. Add 2 edge loops on the inside (again top and bottom), and add 2 edge loops on the top and bottom side of the pipe, near the inside of the pipe. With this, you made the inside flat, while the outside remaines smooth.


Step 78
Select the outer pipe, the ornament piece, and the piece you made earlier, and isolate them in the Top view.

Step 79
Duplicate the ornament piece, and position it around so that it makes physical sense that they could actually be holding the outer pipe. Remember not to scale them on the y axis, if you have done so by accident, just scale them back so that they have the same height. If you followed with the numbers so far, the scale should be 0.1 on the y axis.

Step 80
On to the handle. Delete the top faces (near the Tsuba).

Step 81
Add one edge loop near the bottom.


Step 82
On to the cloth part. When you activate the smooth mesh preview, you will see that the narrow part of the bow shape is not holding. Fix that by adding edge loops near the center edge.

Step 83
Now to add some folds to it. Start by adding a few edge loops horizontally.

Step 84
Select the edge loops (alternating between not selected and selected) and scale them inwards.


Step 85
To add some thickness, extrude the whole shape out. We are not going to duplicate this for now, but will duplicate and place it after we have laid out the UVs.

Step 86
We are nearing the end of the modeling part. All that is left is the Saya (scabbard), and the small piece under the Tsuba, the Fuchi. First we will make the Saya. For this we are going to reuse geometry again. Duplicate the center piece of the Tsuba.

Step 87
Delete all of the inside faces.

Step 88
Delete all the extra edge loops you added earlier, except the ones in the front (we will tweak this shape later). Select the edges to be deleted, and go to “Edit Mesh>Delete Edge/Vertex”. This will delete the selected edges and associated vertices.

Step 89
Position the piece to be ready for extruding.

Step 90
Select the top edge loop, and extrude it straight up to the tip of the blade.

Step 91
Now you need to close the hole, but as you can see it has 7 edges. This means that if you were to connect them now, you would end up with one triangle, and that is something that should be avoided. For that purpose we will add one edge.

Step 92
After you have added the edge, select the top edge loop and go to “Mesh>Fill Hole”.

Step 93
Now go to “Edit Mesh>Split Polygon Tool”, and use it to split the big n-gon polygon you just created. With the Split Polygon tool active, left click on one of the top edges.

Step 94
Middle click and drag the point so that it is over one of the vertices of the edge.

Step 95
Now left click on the other side.

Step 96
Middle click and drag so that it is over the vertex of the edge on the other side. Then press Enter on your keyboard. With this you have split the polygon in two.

Step 97
Repeat the same process to connect the other two edges, so that you remain with all quad faces.

Step 98
Add 4-5 edge loops along the height, so that we have something to move, and get it in shape.

Step 99
In edit vertices mode, move the vertices from the edge loops you just added so that they follow the curvature of the blade.

Step 100
Select the bottom row of faces and extrude them out a bit.

Step 101
Isolate the Habaki and the Scabbard so that you can view them better. Select the inner edge loop and extrude it inward a bit. Move the vertices so they fit nicely around the Habaki.

Step 102
Select the extruded edge loop and extrude it down in to the Saya. This will give the illusion of thickness.

Step 103
All that’s left now is to add some edge loops to hold the shape. Start by adding some edge loops on the extruded part.

Step 104
Add edge loops on the outside. Again top and bottom, and near the 90 degree angle.

Step 105
Go to the top of the Scabbard and add an edge loop to hold the tip.

Step 106
And now the last part. Again duplicate the center piece of the Tsuba.

Step 107
Delete the extra edge loops that hold the corners using the Delete Edge/Vertex tool.

Step 108
Place it under the center piece of the Tsuba. Make sure that the top of the Fuchi is aligned with the bottom of the center piece. You may have to move some vertices depending on your shape.

Step 109
Add one edge loop horizontally in the middle.

Step 110
We will make this piece as the transition between the Tsuba and the handle. We need the top half following the outline of the Tsuba, while the lower half follows the handle. Add one edge loop to hold the top half and one to hold the middle.

Step 111
Next are the back corners. Make them hold by adding one edge loop on the back side near the corner edge.

Step 112
If we left it like this, the edge would be held all the way down to the handle. For that we are going to space out the edges on the lower half. Grab the edge on the bottom and move it away from the corner.

Step 113
Select the vertices on the bottom, and move them down to make the shape bigger.

Step 114
Select the corner vertices on the back and move them forward, so they better follow the line of the handle.

Step 115
Add one edge loop to hold the lower half.


Step 116
That’s about it from the modeling part of this tutorial. Next we are going to lay out the UVs, and create some textures for our Katana. Again if you haven’t saved so far, now would be a good time:)

No comments:
Post a Comment