Final Product What You'll Be Creating
Note: click the ‘Monitor’ icon to view tutorial in full-screen HD.

In this tutorial by author Chandan Kumar, you’ll learn how to create a dynamic grass simulation in 3D Studio Max. This effect can be achieved rather quickly using Max’s built in Hair & Fur modifier, which allows for dynamic interaction between objects, creating a convincing, realistic result.
Download
Note: click the ‘Monitor’ icon to view tutorial in full-screen HD.
In this tutorial you’ll learn how to build a detailed city in 3d Studio Max using the Ghost Town plugin. For those of you who are unaware, Ghost Town is a script that procedurally generates cities and urban environments in only a few clicks, and features a number of options. Such as low or high poly buildings, road layouts, vehicles, trees, facades and an easy to use material and texture system. Let’s take a look!
Download
Note: click the ‘Monitor’ icon to view tutorial in full-screen HD.
Hello Everyone,
The main purpose of this guide is to solve some of the confusion & errors that we will face while using this plug-in, these are as follows:
Always remember to build surfaces, geometry or shapes between the blue & red lines, otherwise the script will not work and will cause errors in the final output.

Always remember to update the material library before making a city or any other structure.

While building any city, always remember to draw it using the plugin grid. Then select the shape and click Setup>Build (here the plug-in will ask you to set the system to metric/cm? Click “yes”.) After this, we’ll finally get the city to build.

To add geometry to your object library, just build your required geometry on the grid. Select it, then select your required category > name your geometry > save. After that always update your texture library before applying it to the current scene.

Download any texture and click the “Add Texturemaps” button under the “Materials” section in the plug-in. This will allow you to select and use your desired texture. After everything is done, always remember to update the material library or your will receive errors.

>Building…
City number = 2
Redrawviews=false
LoPoly=true
> Starting build…
> Filtering small faces…
— Runtime error: EPoly face index out of range: < 1 or > 0: 1
To solve this error please update your material library as soon as you open the plug-in in 3DS Max or you will receive this error.
In today’s quick-tip tutorial, Chandan Kumar walks us through how to enable and use the incredibly cool Lume Shader in 3Ds Max. Let’s take a look!
Download
Note: click the ‘Monitor’ icon to view tutorial in full-screen HD.

Being creative with the dynamic systems in our 3D applications can produce stunning, exciting and elegant results. In this tutorial, Sachin Joshi walks us through one such example using Particle Flow in 3Ds Max, showing us how to assemble and disassemble objects within your scene.
Download
Note: click the ‘Monitor’ icon to view tutorial in full-screen HD.
Download
Note: click the ‘Monitor’ icon to view tutorial in full-screen HD.

If you work with more than one computer, keeping track of textures and scene files can be a nightmare! In this quick-tip, Benoit Staumont takes us through his ingenious solution to the problem. Utilising both Max’s Asset Tracking functionality and some command-line shortcuts, today’s tutorial shows you one way of managing your files across all of your Windows PCs.
Download
Note: click the ‘Monitor’ icon to view tutorial in full-screen HD.
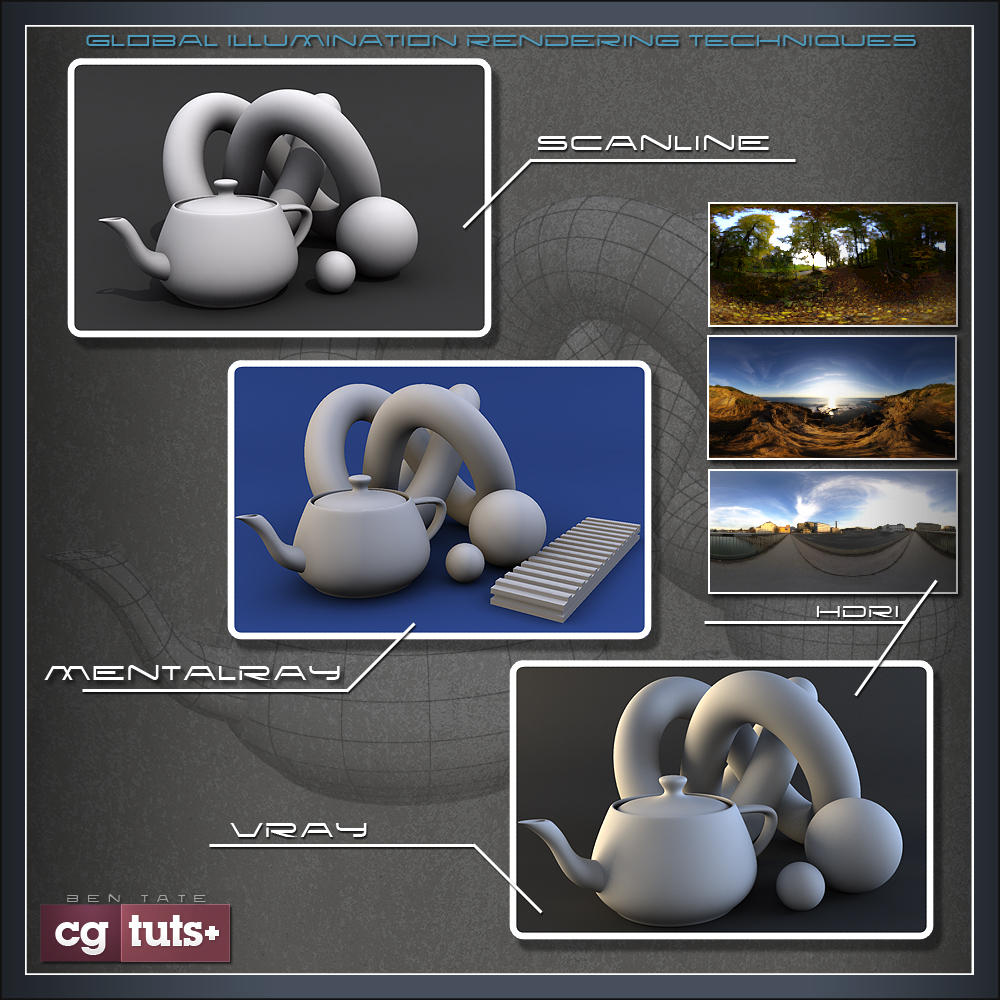
Model presentation is a crucial step for every artist when building their portfolio. In this tutorial, Ben Tate takes us through a few techniques for creating a global illumination or “clay” render using 3Ds Max and it’s 3 common render engines – the scanline renderer, Mental Ray and finally V-Ray. He’ll also look at implementing additional lights, adding color variation, removing noise, and how to add image based lighting using HDRI images.
Download
Note: click the ‘Monitor’ icon to view tutorial in full-screen HD.
Download
Note: click the ‘Monitor’ icon to view tutorial in full-screen HD.
Download
Note: click the ‘Monitor’ icon to view tutorial in full-screen HD.
In this tutorial you will learn how to use particles systems with FumeFX and Krakatoa to create a very cool looking Ink dispersion effect inside of 3ds Max. Then, once the effect has been created and rendered, you will also learn a couple of neat compositing tricks to create the final video in After Effects.
Download
Note: click the ‘Monitor’ icon to view tutorial in full-screen HD.
In this 3ds Max tutorial you will learn how to generate a torn flag animation using cloth simulation, and also how to combine all of the elements, such as the flag, debris, and dust, in order to create to the final scene in After Effects.
Download
Note: click the ‘Monitor’ icon to view tutorial in full-screen HD.

In this intermediate level modeling tutorial, you will follow Ben Tate as he demonstrates how to create a deatailed domed structure and water fountain in 3ds Max.
A combination of both poly modeling and spline modeling techniques will be used to complete the structure and the water fountain. You will learn quick and efficient methods to build detailed molding pieces, utilizing simple extrude and bevel techniques, as well as combining spline profiles and the lathe modifier, as well as creating and positioning objects using the Array tool, and applying smoothing groups to your models.
Download
Note: click the ‘Monitor’ icon to view tutorial in full-screen HD.
Download
Note: click the ‘Monitor’ icon to view tutorial in full-screen HD.
Download
Note: click the ‘Monitor’ icon to view tutorial in full-screen HD.
Download
Note: click the ‘Monitor’ icon to view tutorial in full-screen HD.

In this quick tip we will take a beginners look at VrayRT, examining worflow, and a few basic techniques to get you up and started with Active Shade rendering.
Download
Note: click the ‘Monitor’ icon to view tutorial in full-screen HD.
In this intermediate level modeling tutorial, you will follow Ben Tate as he demonstrates how to create a deatailed domed structure and water fountain in 3ds Max.
A combination of both poly modeling and spline modeling techniques will be used to complete the structure and the water fountain. You will learn quick and efficient methods to build detailed molding pieces, utilizing simple extrude and bevel techniques, as well as combining spline profiles and the lathe modifier, as well as creating and positioning objects using the Array tool, and applying smoothing groups to your models.
Download
Note: click the ‘Monitor’ icon to view tutorial in full-screen HD.
Download
Note: click the ‘Monitor’ icon to view tutorial in full-screen HD.
Download
Note: click the ‘Monitor’ icon to view tutorial in full-screen HD.
Download
Note: click the ‘Monitor’ icon to view tutorial in full-screen HD.
Adobe Design Premium CS5 software offers you complete creative freedom without sacrificing precision or quality, whether working in print, web, interactive, or mobile media.
In this short tutorial, you will learn how to simulate chains, necklaces, or pearls using an easy and very efficient method with reactor in 3ds Max. After watching this, you will be able to simulate chains in just a few short seconds, a skill which can prove to be very useful in countless different situations.
To make things easier, I have already created a chain and a deflector cylinder for you, so now let’s just see how to do the simulation. Open “Chain.max” if you are working with 3ds Max 2010, if not, import “Chain.obj” into your scene.

In the “Front” viewport, create a “Line” along the chain. This “Line” will be the object that you actually simulate, while the chain is driven by it using a “Skin” modifier.

Select the “Line”. In the “Modify” panel, “Selection” rollout, click the “Segment” button, and select the existent segment of this spline. This segment needs to be subdivided to be able to simulate the “Line” with reactor.

In the “Geometry” rollout, set the “Divisions” spinner to ‘40′, and click the “Divide” button. This operation subdivides the selected segment by adding the number of vertices specified by the spinner…in this case ‘40′.

In the “Modify” panel, add a “reactor Rope” modifier.

In the “Properties” rollout, change the “Rope type” to “Constraint”, because you don’t need flexibility, and enable “Avoid Self-Intersections”.

Select the vertex from the top, and in the “Constraints” rollout, click the “Fix vertices” button.

Now, you need to include these objects into “reactor Collections”, to be able to simulate them with reactor. With the “Line” selected, go to “Animation > reactor > Create Object > Rope Collection”. Now the spline is included in the newly created “Rope Collection”.

Select the “Cylinder”, and add it to a “Rigid Body Collection”.

Go to “Animation > reactor > Create Animation”, to create the animation of this rope. You can also watch the simulation in real-time, by selecting “Preview Animation”.

After a few seconds the simulation is done, and the “Line” acts like a rope. Go to Frame 0, select the Chain and add a “Skin” modifier to it. In the “Bones” section, click the “Add” button and select the “Line”.

Play the animation. Now the chain is animated, and driven by the “Line”.

As you may know, when you get a grasp on particles in CG, the possibilities of what you can accomplish are nearly limitless. In this 3ds Max based Particle Flow tutorial, you will learn an easy method of dispersing a logo into particles using materials.
First of all launch 3ds Max. Now go to “Create > Shapes > Text”, and in the text field type “CG TUTS”. Apply the “Extrude” modifier to it to give it some depth.

Now go to “Create > Space Warp > Forces > Wind”. This will create a “Wind” icon in the view port. Put it on the left side of the text in the view port.

In the same way create a “Drag” and put it beside the “Wind” in the view port.

Now it’s time to tweak the values of these space warps in the view port. Select the “Wind”, and in the parameter rollout, set the “Strength” to 0.5, the “Turbulence” to 0.88 , the “Frequency” to 1, and the “Scale” to 0.02.

For the “Drag”, sin the Parameters rollout, under the “Damping Characteristics” group, set the X-axis to 15.0, the Y-axis to 13.0, and the Z-axis to 15.0.

Now make some random shapes with the help of the Line tool (as shown). Note: The final effect will depend on you how do you make these in random shapes. Select them all and make a Group.

Now go to “Create > Particle System > PF source” and drag it in any of the viewports.

Select the “PF Source” icon in the viewport, and in the “Setup” rollout, click on the “Particle View” button, or hit 6 on your keyboard.

Now your Particle View window is displayed. Create a Standard Flow and delete the Position Icon, Speed, and Shape from it, since you won’t need them for this task.

Drag a “Position” object into the event, and under the “Emitter Objects” window, add the text “CG TUTS”. Select “Grayscale” in “Density By Material”, turn on “Use Sub-Material”, and set Material ID box to 2.

In the same manner, add a “Shape Instance” and “Force” to the event as well.

Select the group of line shapes for the “Shape Instance” and for the “Force”, add a “Wind” and “Drag” in the “Force Space Warp” window.

Now open the material editor, and in an empty slot assign a multi/sub object and
set the number of materials to 2. Now click on the sub material 1 and in the Diffuse channel, select any color (in this case white).

Put a Gradient Ramp in its Opacity channel. Animate the black ramp, in linear from left to right. Do it in such a way that it must overcast the white untill the 80th frame. Give it a bit of Noise also to have a better look.

Now go to the other sub material 2, and put a Gradient Ramp in its Diffuse. Animate the ramp in linear from left to right in such a way that a strip of black color must travel through the white until the 80th frame. Also make it invert in the “Output” panel.

Copy the Gradient Ramp of the opacity from id 1 and paste it in the opacity of the id 2.

Apply this whole Multi/sub object to the text in the view port.

Assign a “Material Static” operator in the event, and drag a white material slot to the “Assign Material” button.

Press “F9” to render and you will see a beautiful scene of the text “CG TUTS” turning into broken random shaped particles.

Press “F10” to open the render setup window, and set the render frames from 0 to 143, and the output size as HDTV(1280/720).

Set the file format as TGA with 32 bits per pixel (which will give it transparency), and then render the scene in an image sequence.

If you have After Effects, you can use it for some post work, like adding shine from the back side. For this I imported the image sequence into After Effects. If you are not familiar with the After Effects interface, kindly visit www.vfxrider.com, or AEtuts.

Make a duplicate of the “cgtuts” layer by selecting it and pressing “Ctrl+D”, or by going to “Edit > Duplicate”.

Select the layer which is behind the first one, and apply “Effects > Sapphire Lighting > S_Rays”. You can get the Genarts Sapphire plugin from www.genarts.com. Play with the values of rays length and the color. You can use the Trapcode Shine plugin for this kind of look as well.

Now if you hit the play button, you will have a beautiful logo dispersion scene!

